Homemade wine guide
How to Use a Hydrometer for Wine
As an Amazon Associate we earn from qualifying purchases. How we choose products.
On this page
A hydrometer is a weighted glass float that tells you how much sugar is in your juice and how much of it has turned into alcohol. Knowing how to use a hydrometer for wine is what lets you set the strength of a batch before it starts, prove that fermentation is really finished, and write an honest alcohol figure on the label. The University of Georgia Extension’s Winemaking at Home (C717) calls it a simple and inexpensive instrument that takes the guesswork out of winemaking, and essential for consistent results.
This guide covers the whole routine: what the scales mean, how to take a reading step by step, when to take one, how to turn two readings into alcohol content, and the mistakes that give false numbers.
What a Hydrometer Measures
A hydrometer floats higher in a dense liquid and sinks lower in a thin one. Sugar makes juice denser than water, so a sweet must holds the hydrometer high. As yeast turns the sugar into alcohol, which is lighter than water, the liquid thins and the hydrometer sinks. Reading how far it floats is reading the specific gravity.
Specific gravity
Specific gravity (SG) compares the density of your sample with water. North Dakota State University Extension’s Getting Started With Home Winemaking (FN1638) sets out the landmarks: pure water reads 1.000, must starts at 1.080 or higher, and a finished dry wine can read as low as 0.990. Winemakers say the last three digits out loud, so 1.080 is “ten-eighty” and 0.990 is “nine-ninety”.
The other two scales
Most wine hydrometers are triple-scale. Alongside specific gravity they print:
- Potential alcohol, the alcohol the sample would reach if all its sugar fermented and the wine finished at 1.000. It is only meaningful on the first reading.
- Brix (or Balling), the sugar content as a percentage by weight. Grape growers and refractometers use it. Our Brix to specific gravity converter switches between the two.
What You Need
The basic set is a hydrometer and a test jar, a tall narrow cylinder that holds the sample. Add something to draw the sample out of the fermenter: Clemson Cooperative Extension’s basics of home winemaking fact sheet uses a wine thief or a siphon. A thermometer helps with the temperature correction covered below.
| Hydrometer kit | Brewer's Elite Hydrometer and Plastic Test Jar Editor's Choice | SOLIGT Triple Scale Hydrometer and Glass Test Jar | Brewing America Glass Test Jar | aichose Brix Refractometer with ATC |
|---|---|---|---|---|
| Product |  | 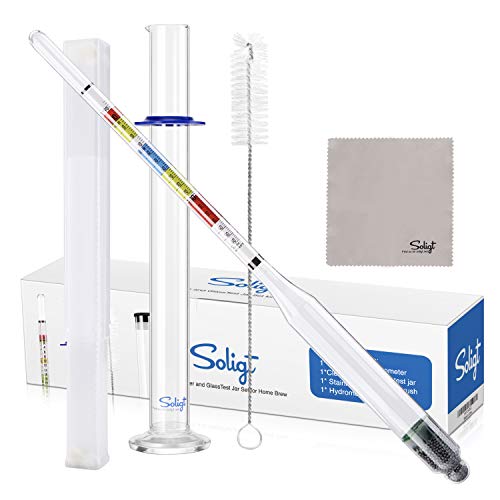 |  | 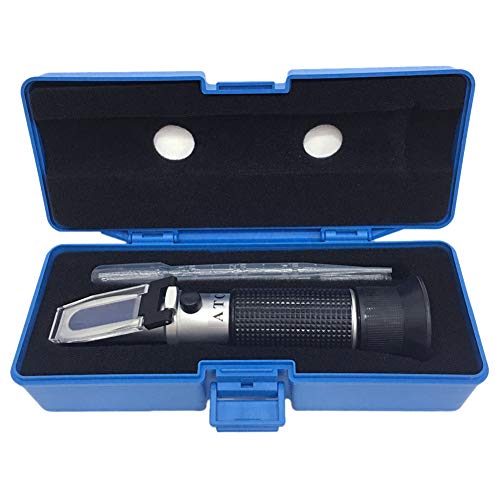 |
| What it is | Triple-scale hydrometer with test jar | Triple-scale hydrometer with test jar | Glass test jar only | Handheld refractometer |
| Scales (maker) | Specific gravity, potential alcohol, Brix | SG 0.99 to 1.17, Brix 0 to 35, alcohol 0 to 20% | Not applicable | Brix 0 to 32%, SG 1.000 to 1.120 |
| Test jar | 250 ml plastic | Glass, about 125 ml sample | Borosilicate glass, about 125 ml sample | Not needed |
| Also in the box | Hard case, cloth | Case, brush, cloth, conversion chart | Cleaning brush | Not stated |
| Use after fermentation starts | ✅ Yes | ✅ Yes | ✅ Yes, with any hydrometer | ❌ Starting reading only |
| Price tier | $ | $ | $ | $ |
| Buy | Check price | Check price | Check price | Check price |
Editor's Choice
Brewer's Elite Hydrometer and Plastic Test Jar
- What it is
- Triple-scale hydrometer with test jar
- Scales (maker)
- Specific gravity, potential alcohol, Brix
- Test jar
- 250 ml plastic
- Also in the box
- Hard case, cloth
- Use after fermentation starts
- ✅ Yes
- Price tier
- $
SOLIGT Triple Scale Hydrometer and Glass Test Jar
- What it is
- Triple-scale hydrometer with test jar
- Scales (maker)
- SG 0.99 to 1.17, Brix 0 to 35, alcohol 0 to 20%
- Test jar
- Glass, about 125 ml sample
- Also in the box
- Case, brush, cloth, conversion chart
- Use after fermentation starts
- ✅ Yes
- Price tier
- $
Brewing America Glass Test Jar
- What it is
- Glass test jar only
- Scales (maker)
- Not applicable
- Test jar
- Borosilicate glass, about 125 ml sample
- Also in the box
- Cleaning brush
- Use after fermentation starts
- ✅ Yes, with any hydrometer
- Price tier
- $
aichose Brix Refractometer with ATC
- What it is
- Handheld refractometer
- Scales (maker)
- Brix 0 to 32%, SG 1.000 to 1.120
- Test jar
- Not needed
- Also in the box
- Not stated
- Use after fermentation starts
- ❌ Starting reading only
- Price tier
- $
We chose these from the hydrometer kits and refractometers available on Amazon when we checked in October 2026, favoring the ones with the widest following among home brewers. Specs come from the manufacturers’ listings. The plastic jar in the first kit is harder to break, the glass jars in the second and third are easier to see through and need about half the sample.
How to Use a Hydrometer for Wine, Step by Step
1. Clean and sanitize
Everything that touches the wine, including the hydrometer, the jar and the wine thief, should be clean and sanitized like the rest of your equipment. A sample is a small batch of wine, and it can carry spoilage into the fermenter if anything goes back in.
2. Draw a sample
Use a wine thief, a sanitized turkey baster or a short siphon to lift enough wine to fill the test jar to about an inch below the rim. With fresh fruit or crushed grapes, strain the sample through a clean cloth first: the University of Georgia’s method measures the sugar of strained juice, because pulp and skins cling to the stem and throw the reading.
3. Lower the hydrometer and spin it
Put the jar on a level surface and lower the hydrometer in by the top of the stem, heavy end first. Clemson’s fact sheet says to spin it lightly as it sinks. The spin knocks off bubbles of carbon dioxide that would otherwise hold it up, which matters most once fermentation has started.
4. Let it settle and read at the surface
The UGA guide says to let the hydrometer ride in the juice until it becomes perfectly still, away from the sides of the jar, and to read the value at the liquid’s surface. Bring your eye level with the liquid. You will see the liquid climb the stem slightly; read the scale where the flat surface of the liquid crosses the stem, not at the top of that curve.
5. Note the temperature
Write down the sample temperature next to the reading. If it is far from the hydrometer’s calibration temperature, correct the number as described below.
6. Record and discard the sample
Write the date, the reading and what you did that day (pitched yeast, racked, added sugar) in a log. Then drink, taste or throw out the sample rather than pouring it back, unless everything it touched was sanitized.
When to Take a Reading
Before the yeast goes in
This first number is the original gravity (OG), and it is the one you cannot get back later. Clemson’s fact sheet says wines should start between 1.070 and 1.100. If your juice is lower, add sugar and measure again; our sugar calculator works out how much.
A few days into fermentation
Foam and a bubbling airlock are not reliable signs. Clemson recommends checking the gravity after three days: if it has dropped from the original reading, the wine is fermenting.
When it is time to rack
NDSU’s FN1638 moves the wine from the primary fermenter into a carboy when the gravity reaches about 1.020 to 1.030. Our guide to fermentation times explains primary and secondary fermentation in more detail.
To confirm fermentation has finished
According to Clemson, most wines ferment to a final gravity of 1.005 to 0.999, and fermentation is complete when the reading is consistent over a three-day period. A very dry wine can go lower, to the 0.990 NDSU mentions. A reading that stops well above 1.005 and does not move usually means a stuck fermentation, not a finished one.
Before bottling
One last reading confirms the wine is stable. Bottling a wine that still has sugar and live yeast can build pressure in the bottle. Our guide to bottling and corking picks up from here.
How to Measure Alcohol Content with a Hydrometer
A hydrometer cannot read alcohol directly in a finished wine, because the alcohol and the leftover sugar pull the reading in opposite directions. What it can do is measure how much sugar disappeared. That is why you need two readings.
The standard homebrew formula, described by Brewer’s Friend in its ABV calculator article as the one most brewing sites use, is:
ABV = (OG − FG) × 131.25
A wine that started at 1.090 and finished at 0.996 is (1.090 − 0.996) × 131.25 = 12.3% alcohol. The same article gives an alternate formula that reports slightly more alcohol for strong wines; the wine ABV calculator shows both.
Using the potential alcohol scale instead
If your hydrometer has a potential alcohol scale, read it at the start and at the end and subtract. A must that shows 12% potential alcohol before fermentation and 0% at the end has made about 12%. The arithmetic is the same idea as the formula, just done on the stem.
Temperature Correction
Liquids get thinner as they warm up, so a warm sample lets the hydrometer sink deeper and reads lower than it should. Every hydrometer is calibrated to read correctly at one temperature. Brewer’s Friend’s hydrometer temperature adjustment calculator notes that older hydrometers are calibrated at 59°F (15°C) and newer ones typically at 68°F (20°C); the calibration temperature is usually printed on the paper scale inside the stem or on the instructions.
You have two options. Bring the sample close to the calibration temperature before reading, which is easy for wine fermenting at room temperature. Or read it as it is, note the temperature, and enter both into a temperature correction calculator such as the Brewer’s Friend one above. Use the corrected number in your log and in the ABV calculation.
Quick Correction Table
For a hydrometer calibrated at 60°F, Craft Beer & Brewing’s hydrometer temperature correction tool gives these adjustments to the specific gravity you read:
| Sample temperature | Adjustment to the reading |
|---|---|
| 50°F (10°C) | Subtract 0.002 |
| 60°F (15.6°C) | No correction |
| 70°F (21°C) | Add 0.001 |
| 80°F (27°C) | Add 0.003 |
| 90°F (32°C) | Add 0.005 |
| 100°F (38°C) | Add 0.008 |
So a sample that reads 1.088 at 80°F on a 60°F hydrometer is really about 1.091. If your hydrometer is calibrated at 68°F instead, the corrections near room temperature are smaller; enter the exact numbers in one of the calculators above rather than reusing this table.
Common Hydrometer Mistakes
Reading with bubbles on the stem
Carbon dioxide bubbles act like a life jacket and push the hydrometer up. Spin it, wait, and if bubbles keep forming, let the sample sit for a few minutes before reading.
Letting it touch the side of the jar
A hydrometer leaning on the glass is held in place by friction and gives a false number. Use a jar that is wide enough, fill it high enough, and wait until it floats free.
Reading at the wrong place
Reading from above or at the top of the curved liquid line adds a point or two. Get your eye level with the surface.
Reading pulp or sediment
Solids in the sample make it read heavy. Strain fresh juice, and draw samples from the middle of the fermenter rather than the bottom.
Using a refractometer reading as the final gravity
Wikipedia’s Brix article explains that alcohol has a higher refractive index (1.361) than water (1.333), so a refractometer overstates the sugar in fermenting wine. Keep the refractometer for the first reading and use the hydrometer for the rest.
Calling it finished after one low reading
A single reading can catch a fermentation that is slowing, not stopping. Wait for the same number three days in a row.
How to Tell If Your Hydrometer Is Accurate
Specific gravity is measured against water, so plain water is your reference. Fill the test jar with distilled water at the hydrometer’s calibration temperature and float it: it should read 1.000. If it reads 1.002, every reading you take is two points high, so subtract 0.002. Write the offset on a strip of tape on the case. Check again if the paper scale inside the stem ever looks like it has slipped, because a moved scale shifts every reading.
Hydrometer vs Refractometer
| Hydrometer | Refractometer | |
|---|---|---|
| Sample needed | A test jar full, about 125 to 250 ml | A few drops |
| Before fermentation | Accurate | Accurate |
| During and after fermentation | Accurate, the standard tool | Reads high because of alcohol |
| Temperature | Correct to the calibration temperature | Self-corrects if it has ATC |
| Best use | Every reading in the cellar | Checking grapes or fruit before you buy or pick |
If you only buy one, buy the hydrometer. A refractometer is a useful second tool for checking the sugar in grapes in the vineyard or at a market without crushing a bucketful.
Our hydrometer pick
One kit covers every reading in this guide. Add a glass jar if you prefer glass, or a refractometer for checking fruit.
-
1Hydrometer and test jar
Brewer's Elite Triple Scale Hydrometer and Plastic Test Jar
Specific gravity, potential alcohol and Brix on one color-coded scale, with a 250 ml plastic test jar, hard case and cloth, according to the listing.
-
2Glass test jar
Brewing America Glass Hydrometer Test Jar
Borosilicate glass jar with a bumper guard and a cleaning brush, designed to use about 125 ml of sample instead of 250 ml, per the maker. Hydrometer not included.
-
3Refractometer
aichose Brix Refractometer with ATC, Dual Scale
Reads 0 to 32% Brix and 1.000 to 1.120 specific gravity with automatic temperature compensation, according to the maker. For starting readings only.